Running PAST in Shiny
Installing
PAST Shiny is available through the Shiny branch of our Github repository. The Shiny application can be downloaded here or from the Releases page. Once the Shiny application has been downloaded, some dependencies need to be installed. PAST Shiny will attempt to install these dependencies when the application is first run. The progress of the dependency install can be monitored in the R console from which the application was started.
If the dependencies did not install correctly, they can be installed by the user. In an R Console, run the following line of code to install PAST and its dependencies as well as the dependencies of the PAST Shiny.
if (!requireNamespace("BiocManager", quietly = TRUE))
    install.packages("BiocManager")

BiocManager::install("PAST")
install.packages(c("DT", "zip", "shiny", "shinydashboard", "gridExtra"))
Running PAST Shiny
PAST Shiny can be run easily with two methods. First, PAST Shiny can be run through the R Console with the following line of R code. path/to/folder/with/shiny/ should be replaced with the real path to the downloaded application. Running PAST Shiny through this method will display a URL in the R Console, such as https://127.0.0.1:4000. Visiting this URL in your browser will allow you to use the PAST Shiny application on your computer.
shiny::runApp('path/to/folder/with/shiny/app.R')
Alterantively, PAST Shiny can also be run through RStudio. If app.R is opened in RStudio, RStudio detects that PAST Shiny is an R Shiny application and provides a “Run App” button at the top of the editor. When running PAST SHiny with this method, RStudio will display a browser window showing the PAST Shiny application. PAST Shiny works best with RStudio 1.2 or higher, as an error in RStudio’s browser in earlier versions prevents the results from being correctly downloaded as a ZIP archive.

Options for the various stages of PAST can be set in their respective boxes.
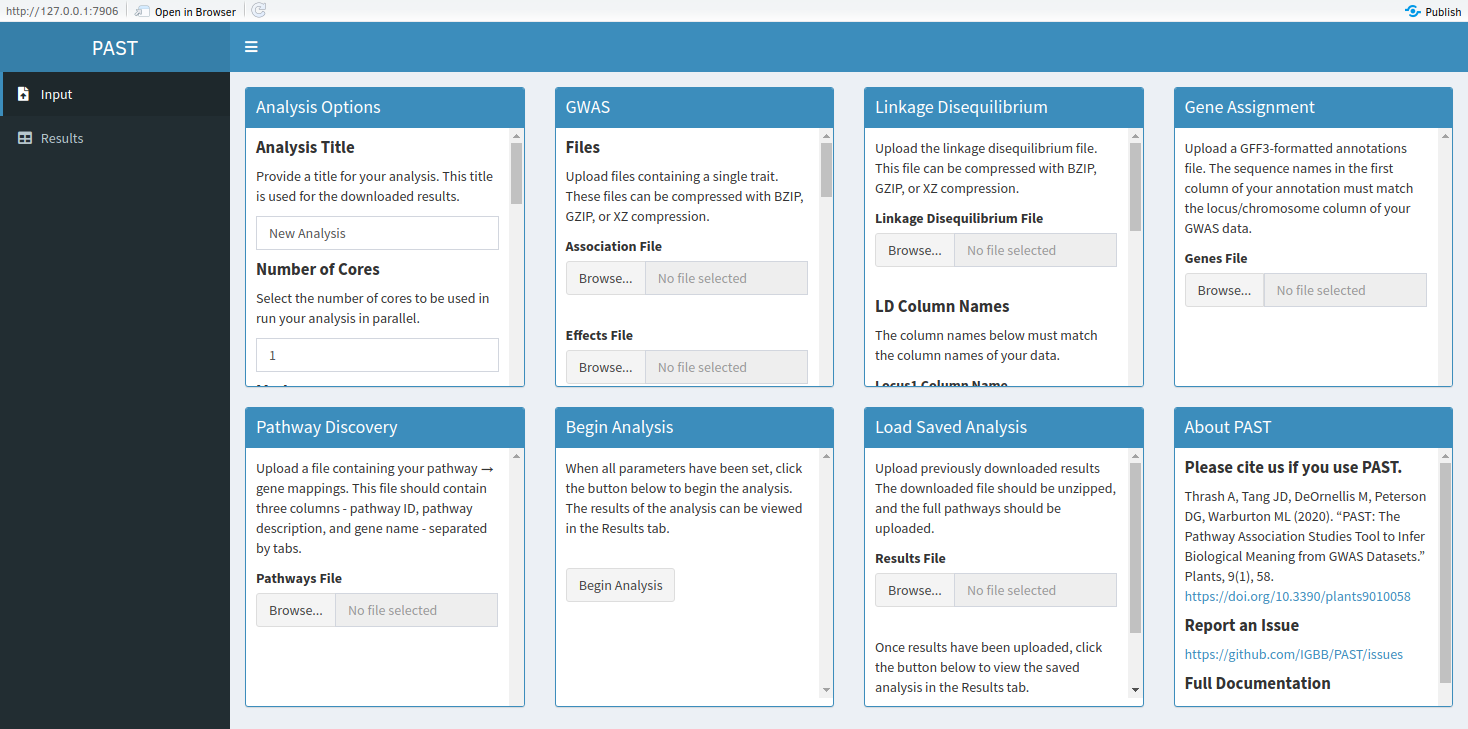
- Analysis Options: These options are used throughout the analysis.
- GWAS: These options include the GWAS files and the names of the columns that PAST needs to run. PAST ignores any column whose name does not match the names provided here.
- Linkage Disequilibrium: These options include the LD file and the names of the columns that PAST needs to run. PAST ignores any column whose name does not match the names provided here.
- Gene Assignment: PAST accepts GFF3-formatted annotations.
- Pathway Discovery: PAST accepts pathway information in a tab-separated format with three columns - pathway ID, pathway description, and gene name. This file should contain a line for each gene in each pathway.
Once the analysis is started, a progress bar will appear to indicate which step has been completed most recently. When PAST finishes the analysis, the application will redirect the user to the Results tab. If the Results tab is opened before the analysis is complete, the Pathways and Plots boxes will display errors.
Download Data and Viewing Saved Analyses
Once a user is satisfied with the filtering level set in the results tab, the data can be downloaded by clicking the “Download Results” button. PAST Shiny will then download a ZIP file contained the pathways data filtered at the specified level, the full unfiltered pathways data, and the images produced using the filtered pathways. If a user wishes to view a previously-completed analysis, then the full pathways data can be uploaded on the Input tab in the “Load Saved Analysis” box.